
|
I came across the video above a few days ago. Now this is how I'd really like to be able to make sourdough bread at home. It features Sam Clark, in the Moro kitchen, making it look ridiculously easy - leave a 'sponge' overnight, mix in more flour in the morning, grab a handful of dough, plonk it in a proving basket (no kneading or stretching!!), leave to rise for 40 minutes (40 minutes!!) and throw it in the oven. Bish, bash and, indubitably, bosh. The video is entitled 'How To Bake Sourdough Bread'. As opposed, say, to 'How To Bake Sourdough Bread If You Have A Restaurant Kitchen, A Mahoosive Industrial Mixer And A Fuck-Off Wood-Burning Oven'. Meanwhile, in a small flat somewhere in Peckham... 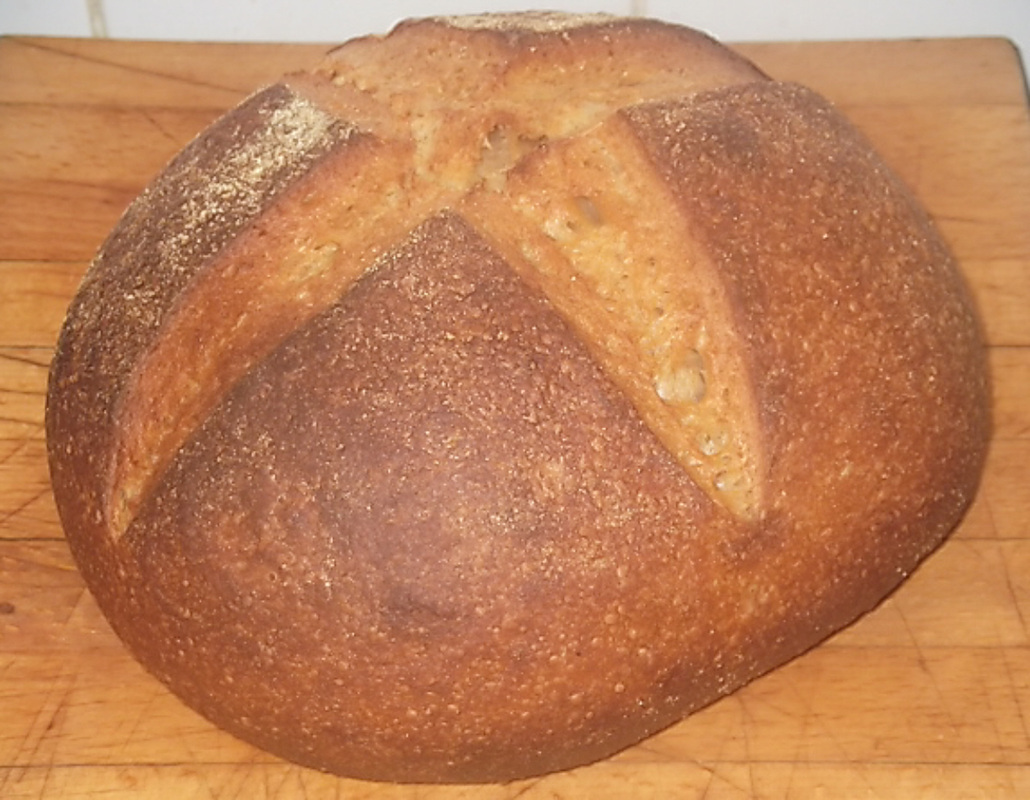 Above: the first (successful) loaf ...at the beginning of March I posted the above photo on my Facebook page, commenting "I've finally made a sourdough loaf I'm happy with. Ridiculously pleased!". I wasn't, however, intending to blog about it, not least for fear of getting a prompt response along the lines of "You're a bit farkin' previous there aren't you my son? Yours Sincerely D. Lepard, S. Clarke, D. Stevens, L. Hart, J. Gellatly, M. Monade & others." But then, after two further attempts, I thought, well, maybe if I write about it someone else out there might find it useful, might be encouraged to have a shot. I'll wager there's quite a few people who fit the same profile as me, that is: we're half-way decent home cooks with little or no baking expertise save for the odd cake, more than content to buy our bread from the experts (in my case living within easy access to the produce of quite a few excellent bakeries - some of my favourites being The Flour Station, Franco Manca and Blackbird). But once or twice a year, inspired by a newspaper article or, perhaps, a gift of a ladleful of starter from a friend, we'll waste almost an entire weekend in the labour intensive production of what is essentially a flour-based manhole cover. But one of the things I've learned is that it's really is worth persevering, adapting, experimenting. Because, I now think, there are actually an almost infinite number of permutations of recipe/flour/oven/environment - and you've got to find the one that works for you in your own kitchen using your oven. It would just be nice if the cookery writers mentioned that fact when banging out a recipe for the Sunday food and drink sections. So I'll give you the recipe that I used for these three loaves but I'm not suggesting for a moment that you follow it. By all means do if you want, but first I'd suggest getting hold of a book that explains in detail the process of bread-making. I borrowed the River Cottage Handbook No. 3: Bread by Daniel Stevens from my local library. There are 50-odd pages of explanation before the first recipe. The recipe below is a mash-up of his 'My Sourdough' recipe (which I can't seem to find online) and this one from Laura Hart (which also gives instructions on creating a starter). Dan Stevens' recipe mentions adding oil, but it isn't mentioned in the ingredients list. I added a tablespoon of olive oil. Neither mention the temperature of the water. Mary Contini (of Valvona & Crolla fame) suggests a water temperature of 30C in the summer and 40C in the winter for her pizza dough and I thought I'd stick with that formula here. You'll see from the photos below how the second and third attempts varied from the first one. None of them, I have to say, had the large air pockets you like to see in, or had much of the distinctive sour tang of, a sourdough. The first issue was almost certainly because I've been adding more flour during the stretching/kneading process in an attempt to get the dough to hold its shape. With the second, maybe the starter needs time to mature. I guess you'd probably more accurately describe what I've produced so far as a 'campagne' style of bread. But they all tasted lovely. And, of course, cost peanuts. I reckon I'm at the beginning of a long and meandering journey towards a really good sourdough. But I think I might just get there. Eventually. 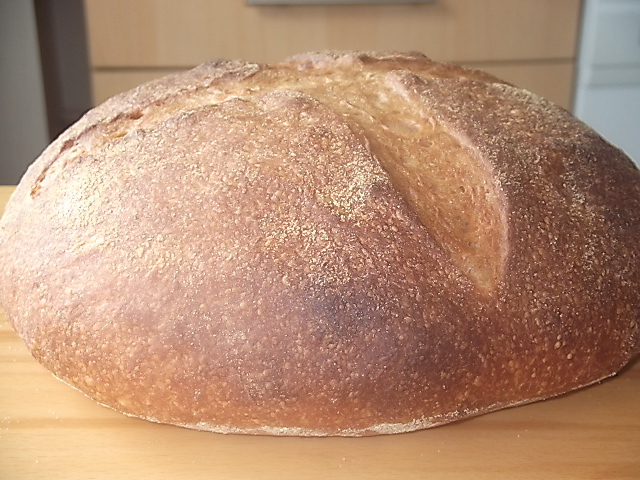 Above: the second loaf (different make of flour)... 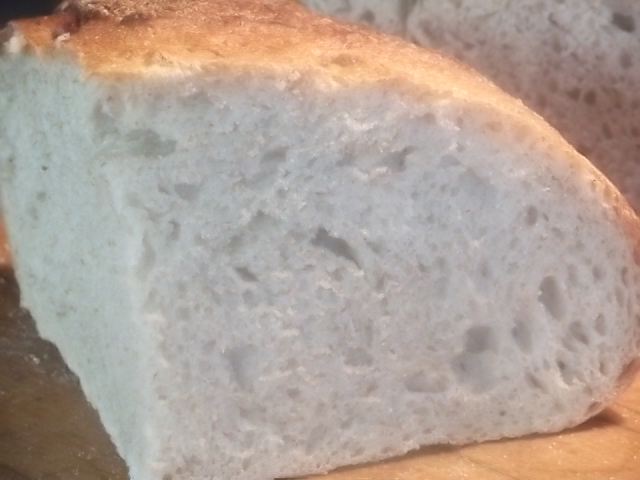 ...and the crumb therein revealed. 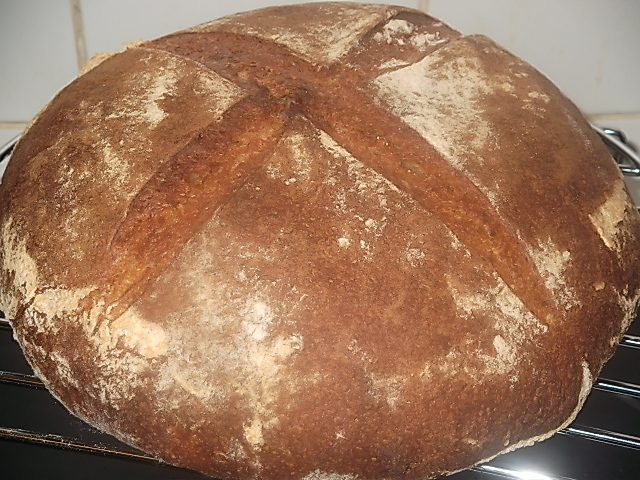 Above: the third attempt (same flour as above but with 20% rye added)... 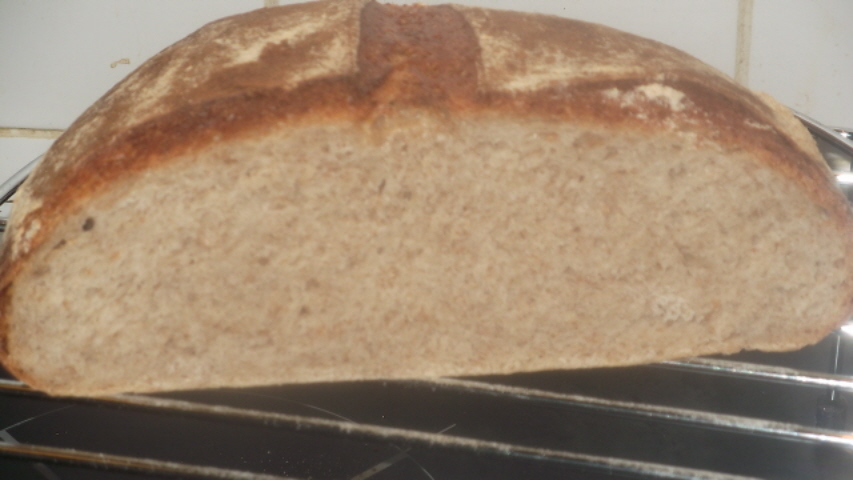 ...with a much denser crumb kitchen + equipment I have an open-plan kitchen, free of draughts (double glazing) with your normal average temperature for a home (68F-ish, I'm guessing), with a bog standard electric fan oven. Set to maximum, it reaches about 240C (fan, remember). I used a mixer with a dough hook to make the dough, but of course you can do this by hand, as in the Laura Hart recipe. For the final rise, not yet having a proving basket, I lined a plastic colander with a piece of well-floured linen. I used a bread knife (as recommended by Dan Stevens) to make the slashes on the top of the dough. For the baking I used a water spray, a tray of boiling water at the bottom of the oven and my pizza stone. To transfer the dough to the oven, not yet owning a peel, I tipped it out onto one of those cheap perforated oven chip trays and slid that onto the pre-heated pizza stone in the oven. I've started saving up my pennies for this proving basket and this peel. starter 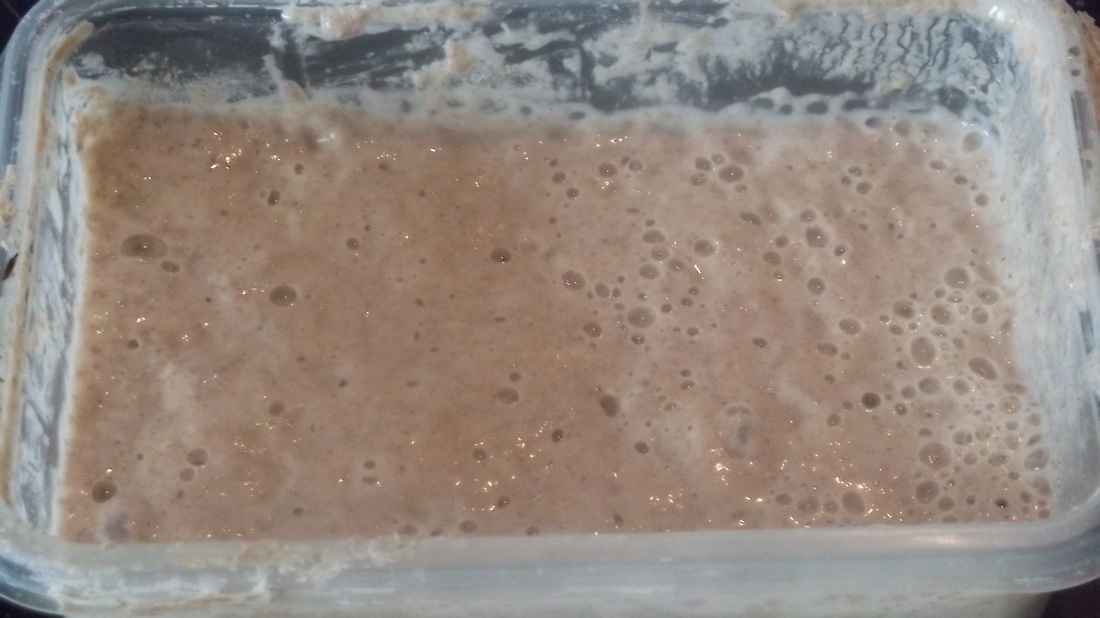 I was given a small tub of starter by someone living nearby me. He'd been making it with wholemeal flour. I've been feeding it with strong white flour, alternating it with rye. But having read that whole grain flour activates a more vigorous fermentation I might try all rye for a while. As I said, the Laura Hart recipe tells you how to make one from scratch. Feed your starter daily or keep in the fridge for a week or so. Remove from the fridge a couple of days before you want to use it and start feeding it again. Don't feed it on the day you start making the dough - you want to have a 24 hour gap so it's hungry. recipe makes one loaf 500g strong white bread flour 150g starter 1 scant dsp fine salt 1 tbsp olive oil (optional) 300ml water more strong white flour for kneading/dusting polenta flour for dusting The night before baking, using a food mixer with a dough hook, mix together 250g of the flour, the water and the starter. Cover the mixer bowl with a plastic bag. The next day, add the remaining flour and the salt; mix on a low speed to combine, then add the oil and mix that in. Turn onto a floured worktop and knead for ten minutes. Form into a round and place in a bowl. Cover with a plastic bag and leave for one hour. Flour your worktop again and tip out the dough onto it. Squidge it out with your fingertips to form a square (like a dimpled focaccia). Stretch the side furthest from you away and fold it into the middle. Give the dough a quarter turn and repeat. Repeat with the other two sides. Form into a round and return to the bowl. Cover with a plastic bag and leave for an hour. Repeat the above process twice more. final shaping + proving Flour your worktop again and tip out the dough. Shape it into a tight round. It's rather difficult (for me anyway) to describe how to shape a loaf in words only, so I'll let this video do it for me (it's the third loaf that she makes into a round at 2:20). Dust a cloth-lined colander, or proving basket if you have one, with flour and place your shaped round into it, seam side up. Leave to prove for (very) approximately three hours. It wants to double in size. baking Place a pizza stone onto a shelf in your oven. Heat the oven to its highest fan setting (as I said mine reaches about 240C). Place a roasting tray of boiling water at the bottom of the oven. Dust your dough with polenta and tip out onto your tray or peel. Slash a cross on the top of the dough, spray with water and transfer quickly to the stone.
After ten minutes reduce the oven to 200C fan. Bake for approximately 30 minutes until the bread is crusty and sounds hollow when you tap its base. Leave to cool on a wire rack. I'd love to get your comments, guidance and tips. Just don't have a pop because I don't really know what I'm talking about. That's kind of the point.
25 Comments
I think making one's own bread, particularly sourdough, is definitely more daunting to the amateur cook than so many other cooking challenges.
Richard
28/4/2012 08:04:26
I started baking my own sourdough bread over four years ago when I moved to the UK from Holland. That was one slow learning curve... I thought the River Cottage handbook was very useful, though -- comprehensive, and with a handy table allowing you to figure out why your bread might be slightly too dense, etc.
The Skint Foodie
28/4/2012 08:41:45
That's great Richard! Just the kind of advice I'm looking for. It's a process isn't it? Like the search for the Holy Grail. Thanks!
Those loaves look wonderful! My family and I have a great love of sourdoughs, and I've been doing them for a while. First ones came out like bricks, but thankfully with some practise I've managed to get it a lot better. My son now eats it :)
The Skint Foodie
28/4/2012 14:30:53
More brilliant advice. Thanks Tannage.
Rose
30/4/2012 09:50:02
I make a lot of bread, but not sourdough. Too complicated for me, well done you! I've found that using Dan Lepard's method of folding while the dough is on its first rise makes the bread a lot more airy. I do this every 15 minutes – more than Dan the Man recommends. Kneading using oil rather than extra flour is a good idea too: it maintins the balance of the recipe and it's frightfully good for one's hands darling!
The Skint Foodie
4/5/2012 12:29:28
Thank you Rose! 1/5/2012 08:15:31
Firstly, can I say how much I enjoy your site and in fact it inspired us to start our own blog.
The Skint Foodie
1/5/2012 08:52:29
Dear Derek
The Skint Foodie
1/5/2012 09:01:40
Oh! And I forgot to say how spooky it was that you mention the Blanc campaigne recipe, cos I came across it the other day as a pdf on t'internet. It's at the top of a google search if you type in 'raymond blanc pain de campagne pdf'.
Harry
2/5/2012 04:00:50
Great stuff! Glad my starter is producing loaves!
The Skint Foodie
2/5/2012 11:28:06
Hi Harry
Harry
2/5/2012 14:42:06
I always feel better seeing expensive sourdough loaves that are flat and misshapen and thinking "yep, I can do that". I pass the rounded ones off as witchcraft.
Ian
4/5/2012 04:48:24
I watched the Hairy Twats in Spain on the box t'other day. Spanish cook had a thermometer which she used to test that the neading had brought the dough temperature up to the required level, which was........nope, it's not there. Good idea though.
The Skint Foodie
9/5/2012 16:23:41
Sorry Kungfoodie, only just looked at your post. You're much farther along the path to the One True Sourdough than me. I particularly liked the idea of adding more starter in the morning to try and reclaim the tang. Worth a bash!
Penny
21/5/2012 13:39:58
I was recently treated to a sourdough session given by Stuart Oetzmann of Metfield Bakery in Norwich. As a complete novice it was a bit mind-boggling but he's absolutely passionate. He talked about the problem of the crust getting too hard in a domestic oven, when commercial ones have inbuilt steam. You can get clay cloches but they are a luxury, so I use a quarry tile instead of a pizza tray thing and then cover the loaf with a large upturned stock pot which traps the steam. I take it off for the last 8 mins or so and it seems to work. But I'll have to try some other method if I want to make a long, rather than a round, loaf. I'm not sure I have got the crumb right yet but it doesn't look too different to yours, which is heartening!
The Skint Foodie
22/5/2012 23:52:46
Hard crust hasn't been an issue here at Skint Towers, maybe because I'm putting a tray of boiling water at the bottom of the oven; but the perfect crumb continues to be elusive! Probably because a domestic oven can't get to a high enough temperature for that initial blast.
john flower
27/2/2013 10:04:44
Suggest you beg, borrow or steal (or even buy) a copy of English Bread and Yeast Cookery by Elizabeth David. All the clever stuff that American and other self-proclaimed gurus are "discovering" is in there.Based on her instructions, I use an old pyrex casserole with a lid to bake loaves of any sort -much better than sloshing water about for steam, it produces its own. I'm all for the easy life and mix up flour, salt water and very little instant yeast (3 gm. for 500gm. flour), leave it covered in the bowl overnight, briefly (2mins.) knead it, shape it, leave to prove for 2 hrs. in the aforesaid casserole, slash it, and bung it in COLD oven then turned on to max. fan(about 250c). 25/30 mins. then take lid off, turn temp. down to 220 ish for about another 25 mins. When it's brown it's done, when it's black it's burnt! Actually I use a thermometer - about 205C at the centre. No mysteries, and I,m sure many people produce better bread - but this way is quick, easy and it tastes bloody good!
John Flower
28/2/2013 08:23:40
Ooos! In my earlier email I put 3g. instant yeast - bad maths, it should be about 1g, i.e.1/4 of a proper measuring spoon.
John Flower
28/2/2013 08:28:55
Oops again! I think I just said 1/4 of proper measuring spoon - it should have been 1/4 of a proper measuring TEASPOON. Just having a go at sourghdough for the first time, literally I just finished kneading it and am sitting with a cuppa when I came across this post. It's brilliant, the perfect outlook on things as like you say, trying to follow tv shows and recipe books in your home kitchen isn't always as easy as it sounds. I've added your blog to my rss feed. Brilliant.
janice
15/10/2016 12:11:09
Brilliant recipe thanks! Your comment will be posted after it is approved.
Leave a Reply. |


SHORTLISTED FOR FOOD BLOG OF THE YEAR 2014
follow/subscribe:
  blog archives:
November 2014
|
