
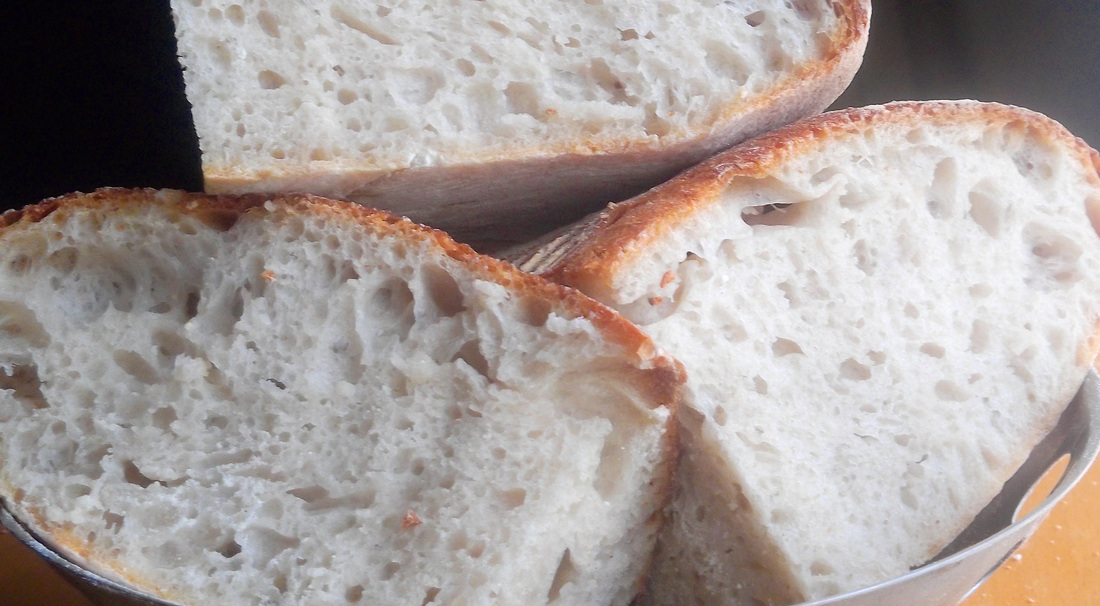
 Behold! Behold my tangy crumb! Click to enlarge! BEHOLD THE CRUMB! DO IT! I'm sorry, but really - crush my huckleberries in a vise and call me Abelard if that isn't just about there crumb-wise. Slightly sticky texture? Check. A sour tang? Check. I think this is probably the one, the recipe I'm going to stay with. I'm not sure I could do any better with the basic domestic oven I've got. So what's different? Well, the weather, for one thing; and rather than the 60p a kilo supermarket flour of my last few attempts I went for a more expensive flour from Bambuni (Shipton Mill, I think), which I'm sure Huey will consider the absolutely crucial determinant; I'm now using a starter that I, erm, started from scratch; I'm also now using a proving basket and a peel (to transfer the dough onto the heated stone in the oven lickety-spit); but, really, I reckon it's mainly down to three factors:
the starter 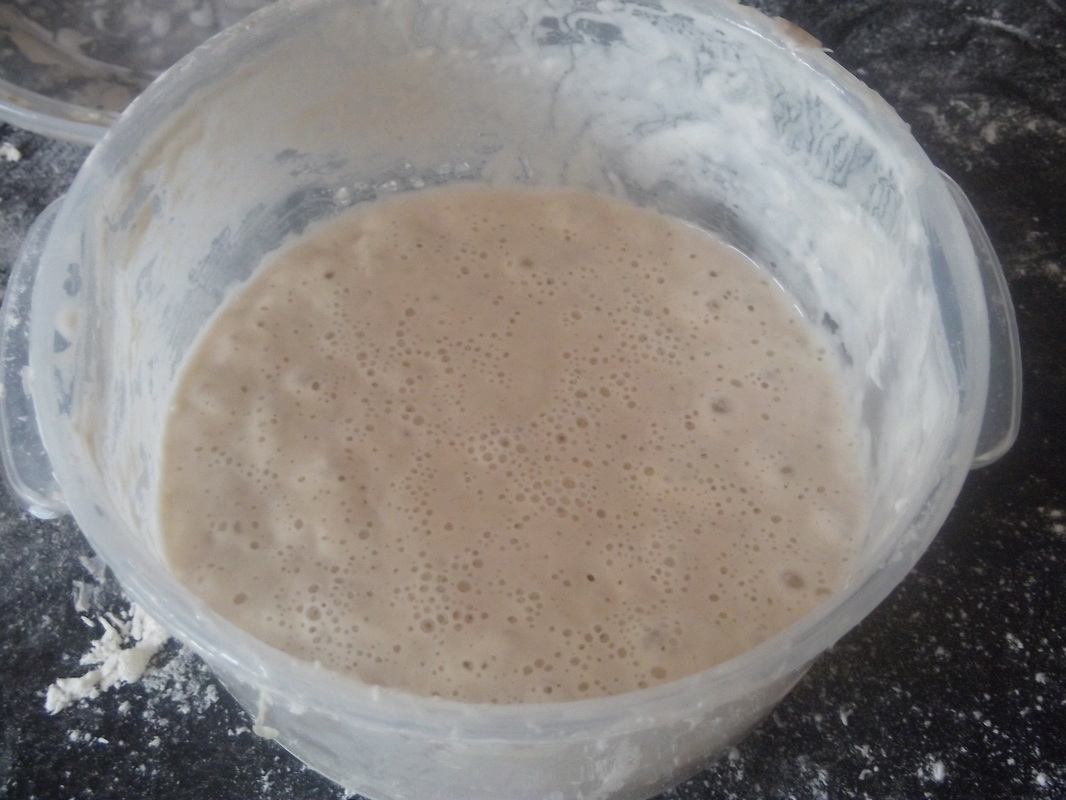 My current starter, a few hours after a feeding First stage: 300g strong white bread flour 300ml water 1 tsp sugar Mix the above in a bowl that has a lid . Place the lid on top and slightly ajar. Leave to rest (on your kitchen top, not in the fridge). Give it a good stir every 24 hours. After a day or so you should see bubbles forming on the surface and smell a distinctive sour tang. Second stage: 150g strong white bread flour 150ml water Throw half the mixture away and mix in the fresh lot of flour and water. Leave for 24 hours. Third and future stages: 100g starter 100g strong white bread flour 100ml water From now on, at every feed, use a third starter, a third flour and a third water - I've stopped weighing now and just use a ladle. You can store it in the fridge for about a week without feeding it if you want. You can also freeze it if you're not going to use it for ages. You always want to leave the starter for 24 hours without feeding before a baking session (so it's nice and ravenous for the flour). If you've stored it in the fridge, remove 48 hours before, feed once after 24 hours and then leave for 24 hours before baking. the recipe makes one loaf 500g strong white bread flour 200g starter 300ml water (stir together 200ml cold and 100ml boiled) 1 scant dsp fine salt a little more flour for dusting 00.00: mix the flour, starter, water and salt together in a large bowl (I used a plastic bowl and a plastic spatula). Cover the bowl with cling-film and leave for one hour. 01.00: Scrape the dough onto your work surface and work the dough as demonstrated by M. Bertinet in the following video. I can't stress strongly enough how much fun this is. In fact, I reckon all he needs to do is dress up in Lycra and add a reggaeton soundtrack and he's got the latest exercise phenomenon on his hands. Zumba? I've shit it. The relevant part of the video starts at 01:05 and ends at 02:49. I guess I must have taken about 15 minutes with this (the difficulty is in stopping yourself). Like he says, don't worry about how sticky it is, or how much is initially sticking to your fingers. When you do manage to stop, flop the dough back into the bowl (I didn't bother about flouring or oiling it), cover again with the cling-film and leave for another hour. 02:00: scrape the dough back onto your work surface and repeat the slapping/stretching procedure for just a few minutes. Return the dough to the bowl and leave for one more hour. 03:00: once again, scrape the dough back onto your work surface and repeat the slapping/stretching procedure for just a few minutes. Then shape into a round as shown in the next video (the relevant bit starts at 02:20): Here's a little slideshow of the various stages of my dough: Place the dough in your (well-floured) proving basket, seam side up, flour the top and cover with cling-film. 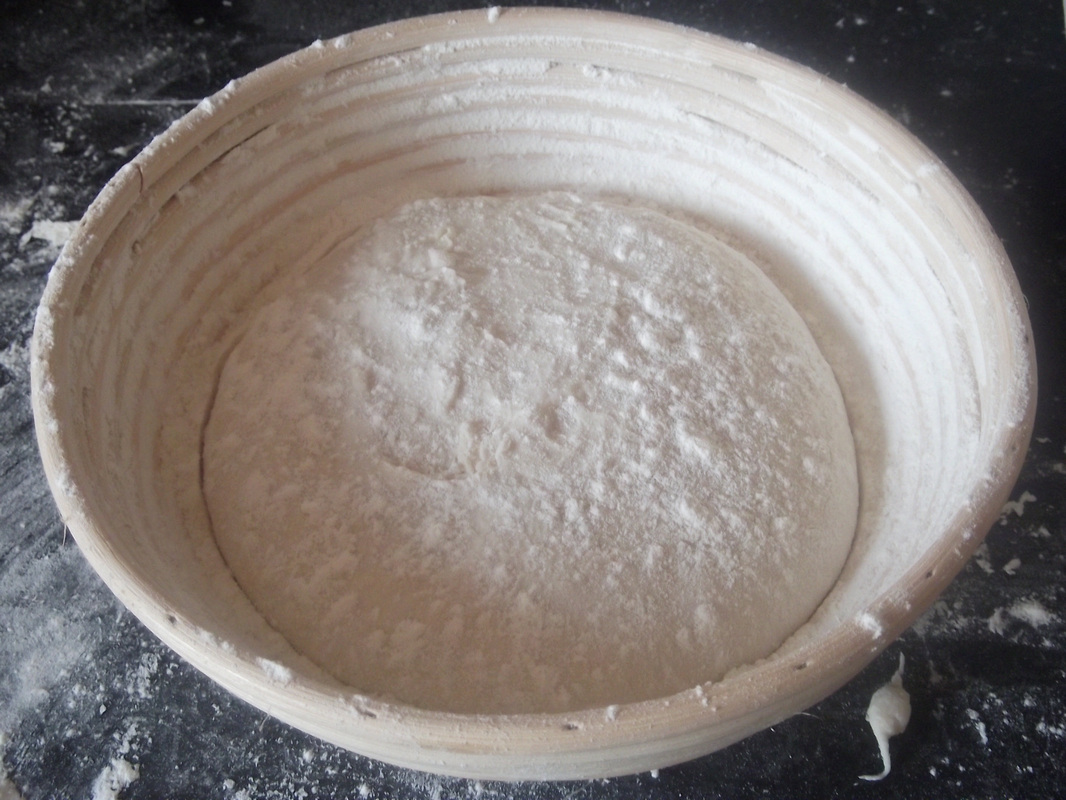 Now leave the dough to rise until almost doubled in size. The timing for this will vary considerably, depending on the conditions in your kitchen; all I can tell you is that my dough took 3½ hours to get to this state: 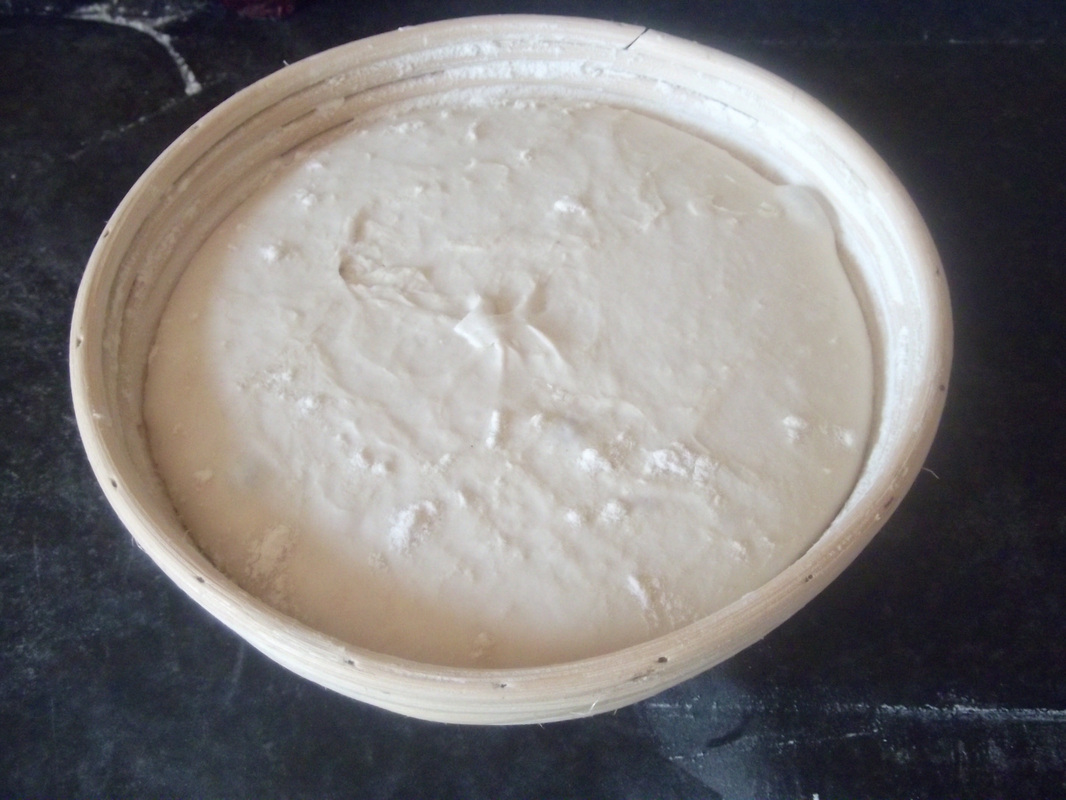 When the dough has risen to your satisfaction, put a pizza stone into your oven and set the heat to the highest fan setting (I think mine reaches about 240C fan). Put a roasting tray on the bottom oven rack and pour in a generous amount of boiling water. Let the oven get back to its highest temperature. Now flour the top of the dough generously to stop it sticking to the peel (polenta is good to use here) place your pizza peel over it and quickly flip. Remove the basket and then, as quick as you can, score the dough with a knife (I used a bread knife to make a cross)*. Slide the dough onto the pizza stone, shut the oven door and leave for ten minutes. Turn the temperature down to 200C fan and leave for 15 minutes. Check to see how your loaf is browning - I turned the oven down to 180C fan at this point and left it for a further 15 minutes before removing the loaf from the oven (so a total time of 40 minutes). 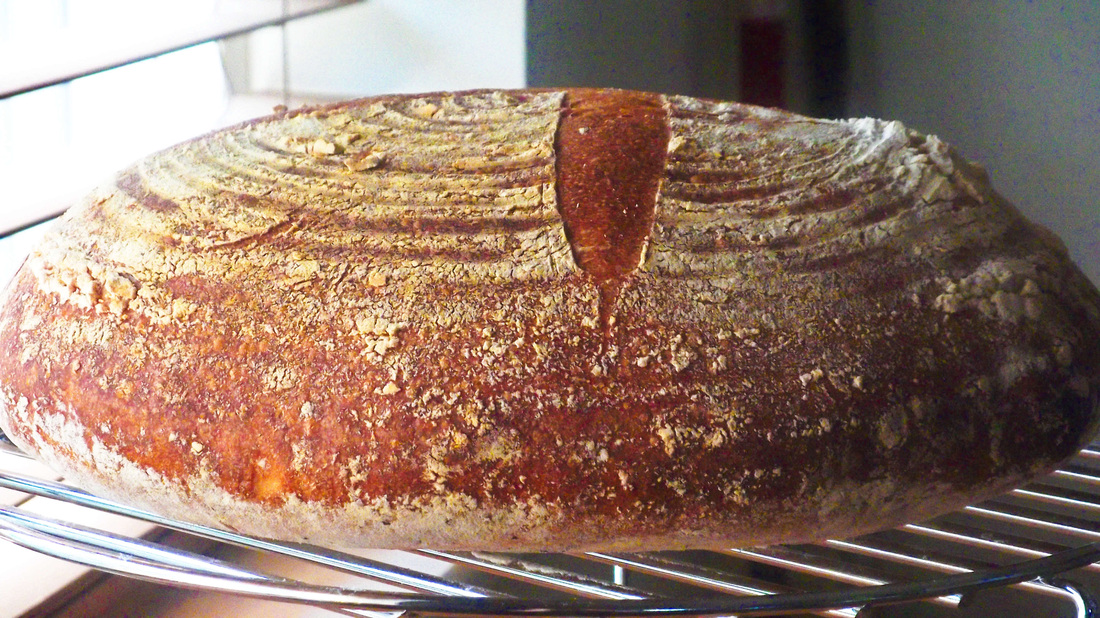 Fresh out of the oven Now you have to resist the urge to cut into it straight away. Let it cool - at least until it is just barely warm. 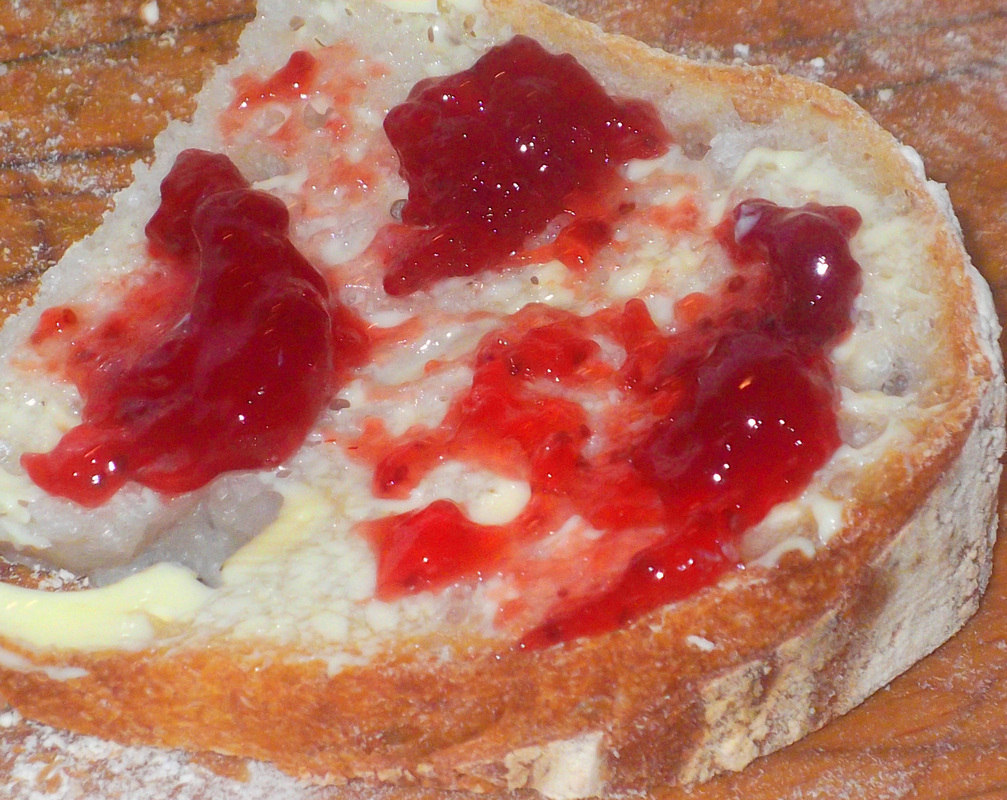 Well, you've got to, haven't you? And yes, while I was enjoying this first slice with a cup of orange pekoe, I did play the Stone Roses at full belt. After all, they played their first comeback gig last night. * Since I wrote this post I've baked two more sourdoughs without slashing the dough before it went into the oven. My thinking was that, by breaking the 'skin' that had formed on the dough while proving, I was only encouraging it to lose its shape and flatten out. As you can see from the photo below, the theory seems to work - the loaf rose much higher. 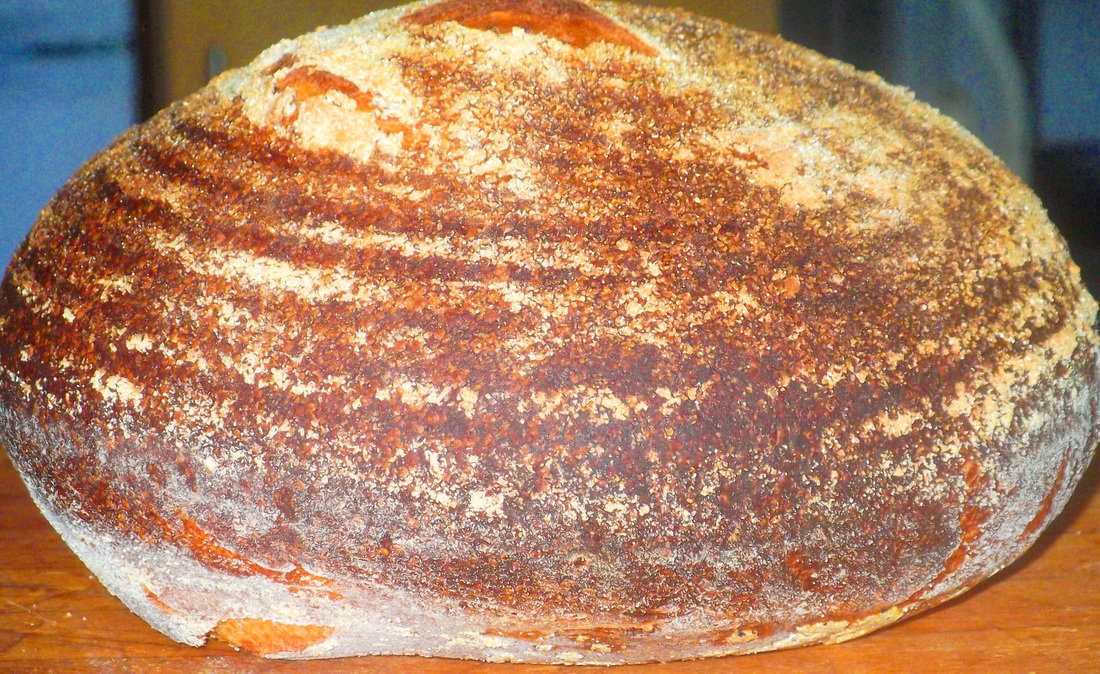
35 Comments
Cathy
24/5/2012 13:25:49
Oh well done! That's made me so happy for some reason. I tried a complicated starter a couple of years ago and it went horrid. And then my neighbour gave me a bread machine and I haven't bought bread since. But I feel like another go now I've seen your pics. 24/5/2012 14:00:53
Gorgeous!
The Skint Foodie
24/5/2012 14:10:59
Have you been making it wetter via more starter or more water? Or both? 25/5/2012 03:24:48
Bit of both. Hey hey loaf looking good! You know about the fresh loaf, right? http://www.thefreshloaf.com/ You'll find over-academic discussions about how to achieve different things with bread and some really good formulae for making some truly excellent loaves. Overkill maybe (we're talking Enthusiasts), but a great resource. Also worth googling for Dan Lepard's bread recipes - there are a few online, and he's The Man in Britain on break cookery at the moment. Happy baking!
Judith
24/5/2012 14:39:18
For days when you haven't got quite so much energy, there's also no-knead bread (although I admit you don't get your therapeutic slapping-about stage). Have you ever tried it? Recipe at http://www.sullivanstreetbakery.com/recipes/noknead.html
Art
25/5/2012 07:05:22
Absolutely. There is no other method that produces bread anywhere near as tasty and good looking for bugger all effort. It is astonishing that no knead has not already become the standard among people who love good bread but balk at becoming slaves to it.
The Skint Foodie
25/5/2012 07:32:59
Interesting. I'd always been put off no-knead from reading this: http://www.davidlebovitz.com/2006/12/the-nail-in-the/ and now I've got the schedule down it doesn't seem much effort at all: start it as soon as you wake up, continue while doing morning stuff, go out shopping during the final prove and bake just after lunch. But I am, of course, 'time-rich'!
Huey
24/5/2012 15:02:37
It woz the flour wot done it :-)
The Editor Writes:
24/5/2012 15:30:17
The legal department of Skint Foodie International™ wishes to make it clear that SFI™ in no way endorses the frankly insane ramblings of this sadly delusional commentator.
Cathy
24/5/2012 19:59:46
brilliant!!! I was hoping you'd post your sourdough recipe. I will give this a go when I get organised, tho not sure how long that will take (haven't made the rhubarb and ginger cake yet but plan to soon). But your loaf looks every inch the absolute thing. Jolly well done!
Chz
25/5/2012 00:27:00
Yummy! My personal preference is to add some rye for additional sourness/nuttiness, but I'd definitely eat that anyhow.
Pauline
25/5/2012 03:24:37
My god, the bread and jam photo looks mouthwateringly yummy and with The Stone Roses on the side...total bliss.
art
25/5/2012 08:00:50
"I'd always been put off no-knead from reading this"
Chris
25/5/2012 12:14:13
"Behold! Behold my tangy crumb! Click to enlarge! BEHOLD THE CRUMB! DO IT!". I DID haha!... Lovely!. Imagine a someone having a particularly shit day, then reading that with a big smile on their face. Well done and well persevered!. After a few unsatisfied attempts I shall be trying yours. I got the crumb but got no tang!!
Mel
26/5/2012 09:00:09
Have to say it's a toss up which is most exhausting and impenetrable to contemplate- this or my daughter's A level Maths- will just gaze at the photo (which looks very nice).
The Skint Foodie
26/5/2012 10:22:41
I'm sure you do yourself a disservice Mel - I'll bet that after a quick lie down in a darkened room you could manage both sums and bread-making.
Mel
27/5/2012 02:23:43
You've had lots of positive feedback from those with less concentration issues, so think it is probably me! I'm more of a 'make biscuits at one in the morning after a drunken evening' type and can only aspire to this sort of dedication!
Sue
31/5/2012 07:19:52
Looks lovely, but I reckon you're posh, what with a _fan_ oven and a smart phone, neither of which I have. Every hardware shop here in Italy seems to sell peels though!
The Skint Foodie
31/5/2012 09:44:59
No one's ever called me posh before - thanks! I'll wager you probably meant to imply cultured, erudite - a renaissance man, if you will.
Nicola
9/6/2012 05:43:33
I have been making sourdough bread for a few months now. I created a "new cross" starter.
The Skint Foodie
9/6/2012 06:53:59
Hi Nicola
Penny
15/6/2012 06:37:50
I have been using a pyrex bowl for proving instead of one of those baskets. Do you think it makes a difference, apart from the lines on the surface?
The Skint Foodie
15/6/2012 09:41:23
Penny - I'm not sure to tell you the truth, maybe it's all in the mind! However, I'd suggest that being porous they allow air to get all around the dough in the final proofing stage. I know that some people improvise a basket by using a colander lined with linen.
Paul
13/8/2012 02:30:57
Thanks for this excellent compilation of what works. I have had many previous failures to produce a satisfactory loaf consistently, and it has taken a bit of fine tuning, particularly of amount of starter, water and final proving container. But... I can now produce an excellent, tasty, good looking loaf consistently by this method. I am currently experimenting with long proving in the fridge to see how that affects flavour but I am grateful that your diligent investigation and testing has got me so far.
The Skint Foodie
13/8/2012 22:19:18
Thanks Paul. I'd love to hear about the results of the longer proving in the fridge.
Vicki
2/9/2012 03:18:58
Thank you for inspiring me to try sour dough once again. I love the no knead bread and various others that I feel confident with but I lust after all that is sourdough! And to hear you say the proving baskets are worth the money is really useful as the price has always put me off. Cheers
mrs Crimbo
6/8/2013 04:09:27
Hi this has given me the will to try again after producing several loaves of good tasting dwarf fighting bread last month.
Dan
25/11/2014 23:24:06
Hi. I'm a bit confused by the third stage. Do you remove half of the starter but mix 100g of it with 100g flour and 100 ml water, then add it back to the remaining half? It's looking good so far and I don't want to cock it up!
The Skint Foodie
26/11/2014 01:47:35
No, you just use 100g of the starter and either use or throw away the rest. Good Luck!
Dan
26/11/2014 02:25:37
Ah, I see! Thanks for clarifying. I plan to attempt my first loaf tomorrow. 25/7/2015 17:44:15
...and I wanted to know, stupid question first, what is the best way to measure 100gms of starter? I am terrible at measuring anything, cannot understand metric, and as yet have not found a decent receptacle for measuring liquids of the more viscous variety, like sourdough starter! I am at the second stage so far, having ditched roughly half the bowl of starter and then added roughly (!) 100gms of flour and 100ml of water. How precise does it have to be?
anina
13/7/2015 19:41:08
Hi there.. I am greatful to have the bertinet recipe.. and I am obsessed by dough.. Your comment will be posted after it is approved.
Leave a Reply. |


SHORTLISTED FOR FOOD BLOG OF THE YEAR 2014
follow/subscribe:
  blog archives:
November 2014
|
